Three Do-It-Yourself (DIY) Holiday Decorations
{Guest Post from Anisha at NerdWallet}
It is simply phenomenal what you can do with a little creativity and some basic arts and crafts items. This holiday season you can easily save a ton of extra money by following these instructions for DIY holiday decorations! These are easy and cheap enough to do with the kids, friends, and family members of all ages. There’s no reason to break the bank this season, so simply follow these tips and instructions for quick and easy ways to decorate the home this holiday season.
It is simply phenomenal what you can do with a little creativity and some basic arts and crafts items. This holiday season you can easily save a ton of extra money by following these instructions for DIY holiday decorations! These are easy and cheap enough to do with the kids, friends, and family members of all ages. There’s no reason to break the bank this season, so simply follow these tips and instructions for quick and easy ways to decorate the home this holiday season.
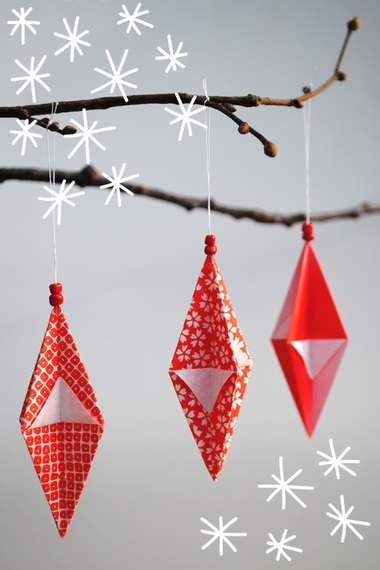
Paper Decoration by Mini Eco
1. Origami Hangers
Origami is perfect for decorative arrangements that last all year long. Always soothing and beautiful, origami is a super fun and easy way to decorate this holiday season. These customizable DIY hangers can be hung from a Christmas tree, mantelpiece, balcony, or anywhere in and outside of the home. Here’s what you’ll need:
Use the internet or ‘How To’ book to find your favorite origami designs. Fold and create your desired origami designs from the colored paper. Colored pens or pencils can be taken to the paper for additional decorative designs such as eyes, feathers, or surrealist artwork. Paper clips and/or string can be used to hang your fun designs from a Christmas tree branch or other areas around the home.
Origami is perfect for decorative arrangements that last all year long. Always soothing and beautiful, origami is a super fun and easy way to decorate this holiday season. These customizable DIY hangers can be hung from a Christmas tree, mantelpiece, balcony, or anywhere in and outside of the home. Here’s what you’ll need:
- White or colored paper
- Markers or coloring tools
- Paperclips and/or string
- Internet connection or origami book
Use the internet or ‘How To’ book to find your favorite origami designs. Fold and create your desired origami designs from the colored paper. Colored pens or pencils can be taken to the paper for additional decorative designs such as eyes, feathers, or surrealist artwork. Paper clips and/or string can be used to hang your fun designs from a Christmas tree branch or other areas around the home.
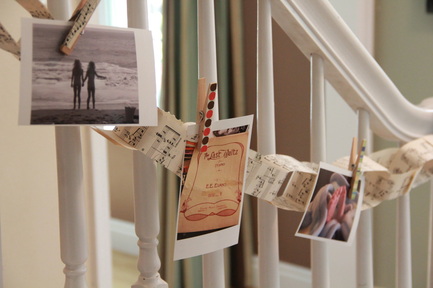
Photo Garland by the High Note Dot Net
2. Photo Hangers
Photo hangers, similar to the DIY origami hangers, can be used to portray your favorite photos or images around the home, from a tree, or over the fireplace. Just follow these instructions:
- Printer with Paper
- Internet Access or Digital Photo's
- Lamination or Clear Adhesive
- Paper Clips or Clothes Pins
Print out your favorite family photos (smaller sizes work best) and place them on larger designs of colored or regular paper. Wrap and protect with lamination or clear adhesive cover. Poke holes in the tops of each image and thread string to paperclip. Hang anywhere you desire and watch your surrounding comes alive with images and photos of all the things you truly love!
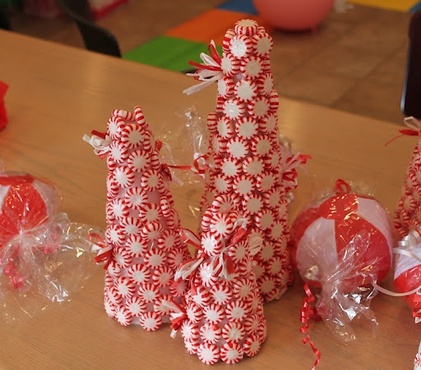
Peppermint Candy Cones
3. Table Candy Placements
These cute little table placements will adorn your table in time for big, delicious holiday meals! Guests will love to sit around these holiday themed placements as they create a holiday feel at just the right time of the year. What you’ll need:
Bring out various sizes of Styrofoam cones that can be found in any major store’s arts and crafts section. Place these upon clean wax paper and glue peppermint candies around the entire cone. Various designs can be used such as a simple round-the-cylinder design to a spiral design, striped with other non-perishable candies. Ribbons can be glued under the candies at the top of the cone, or wherever desired. Let glue cool and dry; place upon table when completed.
These holiday tips come to you from NerdWallet.com, an analysis-driven, quantitatively oriented decision website.
These cute little table placements will adorn your table in time for big, delicious holiday meals! Guests will love to sit around these holiday themed placements as they create a holiday feel at just the right time of the year. What you’ll need:
- Styrofoam Cones
- Wax Paper
- Glue / hot Glue
- Peppermint Candy
- Ribbons (optional)
Bring out various sizes of Styrofoam cones that can be found in any major store’s arts and crafts section. Place these upon clean wax paper and glue peppermint candies around the entire cone. Various designs can be used such as a simple round-the-cylinder design to a spiral design, striped with other non-perishable candies. Ribbons can be glued under the candies at the top of the cone, or wherever desired. Let glue cool and dry; place upon table when completed.
These holiday tips come to you from NerdWallet.com, an analysis-driven, quantitatively oriented decision website.
I link up to a number of these bloggy friends.... as well as to Today’s Creative Blog, Home Stories A 2 Z, The Shabby Nest, The Shabby Creek Cottage, Thrifty Decor Chick, Between Naps on the Porch


 RSS Feed
