for fabulous cheerful and glamorous catch-alls.
Fun before and after of some wooden bowls from the thrift store - turned into bight and happy and shiny gold jewelery bowls.
Crystelle Boutique |
|
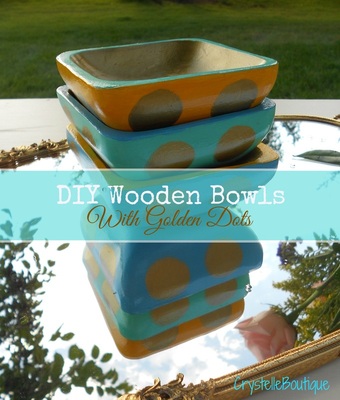
Paint some cute little wooden bowls with gold and happy colors for fabulous cheerful and glamorous catch-alls. Fun before and after of some wooden bowls from the thrift store - turned into bight and happy and shiny gold jewelery bowls.
17 Comments
Finding a place to store your collection of sheet music and still maintaining a tidy-looking room can be quite a challenge. Stacks of music papers and books always seem to gather on the top of the piano and anywhere else around it. It was time to find a place to store the different books and songs in a tidy and organized manner. With the thought in the back of my head that I needed to come up with a storage solution for the music papers and books gathering around the piano at my house, I found an unfinished dresser with skinny drawers at the store. Immediately a light-bulb went on: this might just be the perfect solution to sheet-music storage problems. I took the piece home and was delighted that it indeed was the perfect size for all the music. Plus the several different drawers made the perfect solution for organizing: one drawer for each person plus a few for different categories. Keeping the dresser plain or simple was out of the question, so I got creative and made every drawer a bit different. And the fifth drawer got to display the number five. ~ ~ ~ ~ ~ ~ ~ ~ ~ ~ All in all the little music dresser is a great music paper solution at our house, that is cheerful to boot! As inspiration for the colors I chose I used the fabric print on the drapes you see hanging right besides the little cabinet. Our little music paper dresser sits in the hall, around the corner from the piano. When looking at it you can take a little peak at my fantle above the fireplace in the background at one angle and our Idaho map at the other angel. What solutions have you come up with for storing music papers and books? Twelve tips to get your garden started with gusto this spring It's that time of year when we go outside of our homes and re-discover the outdoors, including our own backyards. Looking forward to abundant fresh vegetables and luscious plants and flowers, we start digging and prepping our yard. Included are 12 tips to make sure your garden is better this year than it has ever been. Carole from Garden Up Green talks up the edible herb ~ Nasturtium which happens to also have a very pretty flower. How fun would those be in your flower bed this summer? And in your salad, of course.... Leslie from the Seasoned Homemaker reminds us that even a beginner or someone with a limited amount of space can grow a successful garden. Gardening tips and inspiration to get you going this year. Renee from Mommy Goes On discusses the value of re-potting your growing tomato plants so the roots have plenty of space to grow. It will be so nice to have fresh tomatoes from the garden for salads and salsa. Mary from Back to Basic Health gives us an April seed planting guide for the United States, divided by regional seasons. A great resource for getting those seedlings started. Carole from Garden Up Green takes her old leaky garden shoes and boots and turns them into the cutest planters ever! Lets have a little fun and color in our gardens this season! Mary from Back to Basic Health explains to us how to grow broccoli from seeds to vegetable harvest. That will be a delicious side-dish on the dinner table! The KidPep team from Dublin California up-cycles toilet-paper rolls as seed pots for seedlings. Easily accessible and biodegradable so you can plant them straight into the soil. Very handy! Tammy from My Abundant Life updates us on how her small Florida vegetable garden is getting along. She also shows us some flower seedlings she started in egg cartons. Great thinking! Wendy from Mama's Blog Central teaches us an easy recipe to easily thwart off the bugs from Hostas. After all, Hostas are so pretty and green and easy to grow. Who wants to share them with insects? Mrs. Tucker from Oh, Mrs Tucker shows off a fabulous raised gardening bed that she and her hubs built together. Easy to assemble on only a small budget. Just in time for growing season too! Ashley from 3 Little Green Woods shares some organized and well-researched square foot gardening techniques she and her hubs utilize in their awesome newly built raised container garden. Carole from Garden Up Green uses some handy chicken-wire covers for her raised garden boxes to keep out the chickens and other creatures. Built from 2x4's and with a fresh coat of white paint, they do the trick well. ~ ~ ~ ~ ~ ~ ~ ~ ~ ~ May your garden grow well this year, xox Crystelle Come Join the Party!! Hoping everyone had a terrific Easter, here we are back to "normal" life with another hump-day blog-hop. We are so glad you came to visit. We love seeing what you have been up to and all the wonderful ideas out there. Crystelle's Favorite My personal favorite creation was the French Country Bench by Southern Seazons Jody took an old bench that her mother had given her years ago and fixed it and painted it to become a gorgeous new heirloom for her and her family to enjoy.... Good for her... so adorable!! Thanks for linking up, everyone!!! By linking up here, you give permission to feature your link on my blog and other social media. Wonderful Wednesday Blog Hop - 23 April 2014 Welcome to our 70th Wonderful Wednesday Blog Hop! Spring break, for many families, has come to a close and life is returning to "normal" ...whatever that is! LOL I am challenging myself and you, too, to visit many posts this week. Make a little time for our friends. Leave nice comments, follow, tweet, and pin (from the original source) Take time to enjoy the view, so to speak. Editor's Pick is a new guest. Please stop by her blog and give her a little love! She shared a delicious Lemon Angel Pie. Here are our features: MOST VIEWED VERY POPULAR POSTS Spring Easter Crafts from The Pin Junkie Magic Dough by I Dig Pinterest Buffalo Chicken Tortilla Pizza from Lamberts Lately EDITOR'S PICK Simple Guidelines:
Christine of I Dig Pinterest Tammy of Creative K Kids and⦠The Ultimate Linky Sinea of Ducks ân a Row Linen-look pillow inspired by Pharrell Williams' song ~ Happy Pillows really cheer up the place. Don't you think? Why is that? For one the word "throw pillows" hints at the random relaxed atmosphere they invite. After all, as the word suggests: you just kind of toss them about, throw them where you want them to be. What I visualize is this: just tossing them at the person across the room from you! Maybe he or she sends it flying it back.... Perhaps you even have a pillow fight!!?? Sounds fun, right? Pillows make a sterile environment seem more like home: a place to sit down, relax, stay a while, put your feet up {maybe} and visit for a while. Be yourself. I like to have a variety of pillows in the living-room to encourage a cozy vibe. I've noticed that the song "Happy" by Pharrel Williams puts a spring in my step, as well as that of my children..... Sooooo................. I decided to combine the two: "Because I'm Happy"~ Pillow To make this pillow I used some linen-look canvas I had on hand in the sewing room. The font is Veteran Typewriter and the text was applied using the CitraSolve Method. {Described in this post under Printing Numbers Unto Fabric} For a 20 inch pillow insert I made a 19 inch case for a fluffy full-looking pillow. I must say that the whole family has enjoyed having this new fluffy feather-filled friend in the room. I like this happy pillow because I think it looks cute on the sofa, and everyone else thinks it is a great companion for naps and TV-watching.... What do you do when you feel happy?
Around here we do a lot of "dancing" in the kitchen..... Because I’m happy Clap along if you feel like a room without a roof Because I’m happy Clap along if you feel like happiness is the truth Because I’m happy Clap along if you know what happiness is to you Because I’m happy Clap along if you feel like that’s what you wanna do DIY project for your smart phone Over 91 percent of all people on earth have a mobile phone and 56 percent own a smart phone. This is the latest mobile growth statistics for 2013 in the infographic released by The Digital Buzz Blog. Similar research shows that 80 percent of time on mobile is spent using apps such as online games. The revenue created by online gaming companies is also increasing because of the consumers’ increased adoption of smart phones. Gaming Realms, developer for online bingo game Bingoiceland.com, operates in the growing online gaming market which in 2012 was worth US$35 billion and is expected to grow to US$42 billion by 2015. Social Gaming, where the Company’s activities are focused, is currently worth approximately US$1.7 billion and is expected to grow to US$4 billion by 2015. These figures are predicted to grow more as a variety of affordable tablets are set to be released this year. Aside from having a smart phone or a tablet, most of us also love to buy accessories for our mobile devices. There are accessories for advancing the gaming capability of our gadgets and then there are some meant to protect them. But why buy them when you can make them yourself? Here is a DIY Project on how to make your own leather envelope phone case. Materials -smart phone case pattern -leather/vinyl -topstitching thread -scissors -stitching awl -e6000 glue -needle -tape Instructions First, print out the smart phone case pattern. Lay the pattern on the leather/vinyl; make sure to tape it in place. Use the stitching awl to poke holes as indicated on the pattern. Then, cut out the pattern. To create a dashed line effect, hand stitch in and out around the leather/vinyl through the poked holes. To fill in the unstitched areas, hand stitch in the same approach. Make sure to overlap about 3 stitches to keep the stitches secure. Fold over the left and right triangle flaps. Sew together and make sure the 4 poked holes are aligned. Put e6000 glue to the bottom flap, insert inside, and glue on place. Hold for a few seconds to allow glue to set in and dry. guest post
Two big wall panels with large skeleton keys Easy large canvasses painted with big keys I was asked to decorate for an event in church {New Beginnings} in a KEY theme. Naturally I did not want to spend a lot of money and started looking around the house, brainstorming. I quickly came upon two canvases that I had used before. I had gotten tired of the "art" I had painted on them years ago and had covered them with a coat of white. This is the scenario: my brain + two canvases + key theme You see where this is going, don't you? I got out some of the mint-green chalk paint I made for an earlier post (see here) and painted the background. Then it was time to add some black keys (I just kinda made them up as I went). When the keys were dry I added some quick dry-brush strokes with white paint. Ta-DA!!! I even got them done in time! Yay!! And the beauty is:
~ ~ ~ ~ ~ ~~ ~ ~ Good things, right? Does life get any better than this? 10 Gifts You Can Make Using Canning Jars Guest Post by Naomi Shaw If you enjoy craft projects, chances are you’ve seen plenty of ideas that take household items and turn them into something a bit more special. What’s better than the mason jar – something almost every has already or can get for just a dollar or two – as the foundation of a fun project? Whether you’re making crafts as a gift for friends, family, or even kids; mason jar crafts are fun and rewarding. Below, you’ll find 10 of the best gifts you can make with mason jars. 1. Soap Dispenser Craft a soap dispenser out of a mason jar by putting the top of a soap pump onto the lid. You’ll need a drill bit or cutting tool to do this, and you’ll need to make sure to properly measure the pump rim before cutting the opening to make sure it fits. You can use epoxy or a similar material to hold it in place from the inside of the lid. 2. Piggy Bank Make a piggy bank out of a mason jar by cutting a slot in the top. You can use a simple box cutter if the jar’s top isn’t too thick, though you may need a heavier cutting tool for thick jars. 3. Cookie Jar Create your own cookie jar by filling the inside with the ingredients to make cookies. Take the time decorate or label the jar, and make sure you put the date when you packed the jar on the label since cookie dough doesn’t last more than a few days. 4. Vase Make a vase out of a mason jar by filling the bottom with something like decorative rocks or marbles and inserting fresh flowers. You can even tie groups of mason jars together with raffia or twine to make a larger vase to hold bigger arrangements. 5. Decorative Candle Holder Paint the outside of a mason jar and fill it with sand. Drop a tea light or other small candle in the jar and you’ve got a decorative candle holder that will be a unique color when the candle inside is lit. 6. Food Gifting Fill a mason jar with unique homemade food items for a party. For example, you could make salsa, guacamole or another food item. Mason jars are also great for gift for chefs and food lovers like homemade stocks and broths. 7. Manicure Set Add manicure items to a mason jar and put a bow around the jar. It will make a unique manicure set, and one that won’t easily get lost in the medicine cabinet. 8. Candy Jar Paint the outside of the mason jar with an appropriate color based on the recipients favorite candy and label it accordingly. Fill the jar with the candy before giving it to them. (Think candy canes, or candy corn, for instance....) 9. Glamour Glitter Jar Use Elmer’s glue thinned with water and glitter to paint the inside of the jar. The jar can be used as a candle holder or something as simple as decorative pencil holder or vase. 10. Salt and Pepper Shakers Use a punch to put small holes in the top of a miniature mason jar. Fill the jars with salt and pepper before gifting them as salt and pepper shakers. Mason jar crafts are generally fun, easy activities that are good for the whole family. However, you can get fancy with mason jars if you have the skills and tools to do so. Just make sure you stay safe when working with glass or attempting to cut mason jars. Naomi Shaw is a stay-at-home mom in Southern California. After being a stay-at-home for seven years she works full-time as a freelance writer. She enjoys blogging about mommy tip and DIY tips providing insight, advice and more! She hopes you enjoy this article. Bloggy friends.... & the Dedicated House, the Charm of Home, Coastal Charm, Savvy Southern Style, Today’s Creative Blog, Home Stories A 2 Z, The Shabby Nest, The Shabby Creek Cottage, Thrifty Decor Chick, Between Naps on the Porch Happy Cheerful Bright Pillow With the Word "Laugh" In my effort of trying to make our home a happy cheerful place to come home to at the end of a school or work day, I found myself browsing around the local "Home Fabrics" store.. there I found some nice happy cheerful fabric with fun colors as a base and started my house decorating around the style and colors. So I choose some fabrics in my stash that would match my "base" fabric and made a fun and happy pillow. I drew a cheerful big girl on a swing to illustrate the theme of happiness. Don't you love that exhilarating playful feeling of the wind in your hair (and your stomach doing flip-flops) as you swing on a good old-fashioned swing? Hey, swings aren't just for kids anymore, right? Right!! I then made a fabric applique based onthe drawing. Even the face is stitched by machine! Though that was kinda tricky. {I must admit: I just painted the lips rather than stitching them by machine, because that was above my sewing skills level... ;)...} Now this bright and cheerful pillows welcomes all guests and residents who visit our entry. I hope it helps in some small way brighten someone's day...!! I am curious: What tricks do you use to lighten the mood in your home? Partying with these bloggy friends.... & the Dedicated House, the Charm of Home, Coastal Charm, Savvy Southern Style, Today’s Creative Blog, Home Stories A 2 Z, The Shabby Nest, The Shabby Creek Cottage, Thrifty Decor Chick, Between Naps on the Porch My daughter turned 22 and sooooooo it was time for me to do something creative.... I needed to make her something to remember this momentous occasion by: a little mixed media piece inspired by her AND Taylor Swift's song: "22" After all, you only turn 22 once in your lifetime.... :) "Uh oh! I don't know about you But I'm feeling 22" "Yeah, We're happy, free, confused, and lonely in the best way" It was a lot of fun to play with some old papers and glue and paint. I even found some fun old thingies: a bingo piece (with the number 22!!!) and a vintage tape measure (with the 22 featured at center stage.... ) It was fun to think of this super fun person while I was making it: my favorite 22 year old in the whole world! whatdoyouthink...??? Partying with these bloggy friends.... & the Charm of Home, Coastal Charm, Savvy Southern Style, Today’s Creative Blog, Home Stories A 2 Z, The Shabby Nest, The Shabby Creek Cottage, Thrifty Decor Chick, Between Naps on the Porch |
Crystelle BoutiqueVintage decor, sewing, cooking, tips, projects, homemaking ideas, etc. Categories
All
|